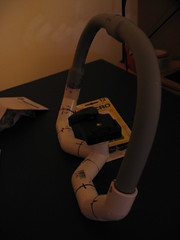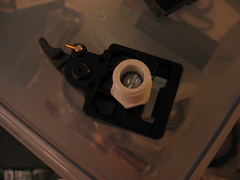

My parts list was a bit different from the original. I'm short a coupler. Only after building it did I realize that his had a 90 degree elbow and a 45 degree elbow whereas mine used two 90 degree elbows.
My Part list
2 x 1/2" SCH40 90-degree PVC Conduit Elbow (Electrical)
1 x 1/2" SCH40 90-degree PVC elbow with threaded side outlet (Plumbing)
6 x 1/2" SCH40 45-degree PVC elbow Slip-type (Plumbing)
8 x 1" of 1/2" SCH40 PVC (Plumbing -- usually sold in 10")
1 x 1/2" SCH40 Threaded Plug (Plumbing)
1 x 1-1/2" Wing screw (-20 Machine screw)
1 x 3/4" SCH40 (-20 Machine screw)
1 Bogen/Manfrotto 3299 Quick Release Adapter
Tools and Consumables
1 roll of electrical tape
1 roll of teflon tape
1 drill with 1/4" bit
1 mitre box
1 hacksaw
1 can of PVC cement and primer
1 Mask
1 Pair of Gloves
The hardest part to find was the 1/2" 90 degree elbow with side outlet. I had to search three Home Depot and two Lowes stores to find it. And it was by chance since it was mixed in with the 3/4"x3/4"x1/2" kind. If you're stuck with that, you can probably use reducing bushings to bring it down to 1/2". Or you could scale bigger so all the parts are common.
You cut the pipe to make 1" connectors then dry fit the rig to your liking. I used a marker to draw lines indicating alignment. Once happy with that I started gluing (actually solvent welding -- primer first, glue next) from the center of the design out. This helps keeping the entire thing balanced. If you've not worked with PVC cement before, make sure to do it in an open spot with a mask on. Use gloves. You apply the purple primer on one both connecting sides to melt the PVC. Then the glue is applied on top of both. Fit the parts together and hold for a few seconds. Clean up the excess goop with cardboard or plastic. Make sure the alignment is correct while its still soft. The cement dries quickly so glue half the connector to each fitting in sections. The rig will smell for days and isn't fully dried until 24 hours later.
The last piece to go in was the top handle bar and the threaded plug. The 1/4" drill bit was used to make a hole in the plug and handle bar for screw mounts. The 3/4" screw went to the threaded plug for the QR adapter. Teflon was used around the plug thread to help put it in. It doesn't go all the way in! Halfway is good enough as long as it is secure. The 1-1/2" wing screw went to the handle bar for the microphone base.
What about the electrical tape? PVC gets brittle under long term exposure to sunlight. So I wrapped it in electrical tape for that NOT PLUMBING look.
References:
Shygantic figrig http://www.flickr.com/photos/shygantic/129121710/
Webstr figrig http://www.flickr.com/photos/wbstr/357975178/
9 comments:
This is nice, a lot more compact than mine. I need to build one like this for every day use. My original design was for videotaping adventures at old lead mines, so I built it pretty heavy.
Thanks for guide. I bought the part previously with 3/4 parts. The 3/4 gives a decent heft and size for hand holding.
I can now film my 1 year old daugther at her height running/walking more fluidly.
I also work in a "Les Stroud, Survivorman" type narration. This was handy when I had my daughter in a backpack hiking.
Thanks
Glad you guys like it. It was fun to build.
Ultimateartophy, thanks for the feedback on using 3/4". I may build a second using that size.
THANX FOR THE KILLER HOW TO!!!
I'd like to add a video how to, link provided below, or search thru revver.com for odd365 videos.
http://www.ayearatthewheel.com/page8/files/0418ba27328aae6a8b2dc18e71a286af-10.html
"1 x 1" of 1/2" SCH40 PVC (Plumbing -- usually sold in 10")"
Shouldn't this be 6 x 1" lengths, rather than a single length?
It's really 8 pieces. There are 6 for the elbows and 2 more to join the top handle. Thanks for the correction!
Mediterranean Advanced Technical Indu. offers PVDC Rigid Film, PVC Shrink Film from Jordan.
wow, great job for the plumber who invent this kind of tool to keep the camcorder in place.
http://www.plumber-baltimore
Nice sharing, Thanks for share with us, I will be come back to your next post, Good luck!!!
Plumber Homewood, Al
Post a Comment